I noticed that some audio files behave in very different ways, especially in the mid and low mid area. My biggest problem now is muddy recordings. I wanted to know what makes an audio sound muddy, and what to do to avoid it. I didn’t want to cut the mids of my mixes since they would lose their bodies every time. I also noticed that some better recordings with a big presence in the low mids didn’t have any muddy sound, so, what causes the difference? (besides using better mics and having better rooms)
Hey there, Andreas. Great question. First off, I’m not clear if you are talking about the recording process or the mixing process (say, with other peoples’ projects).
If in recording, room acoustics are huge and create a lot of gunk. Are you in a treated room? Can look at your mics also. A low end roll-off can do wonders.
There’s tons out there on this, but a few quick thoughts off the top of my head:
When it comes to mud, most of what I’m thinking about is EQ. Using a high-pass filter (HPF) to roll off the low end can be helpful on most instruments, including guitar, vocals, and to a lesser degree bass. Throw an EQ on your guitar and insert a HPF with a 6 dB roll off. Start dragging it up until you can just start to hear a distinct change in the guitar. The guitar will sound thin. Then skootch it back down a tad. Do it again and find a good space where you can leave it, so that the low end is gone, but you can’t hear the difference. Do the same on your other guitars, keyboards, vox, even a lot of your drums (probably not the kick though).
To a degree, the instruments where I do the least with a HPF (say, kick, bass) I make sure are panned to the center. The instruments on the right or left generally are gonna get more cuts.
Another thing is the low-mids. That 250-500-ish range. Every track and their dog wants to be there. All are fighting for space and creating mess. Go carefully on each of your tracks and do a narrow boost that is pretty extreme; sweep around and listen for the frequency in that range where you hear a lot of boom or mud or whatever. Then take that same frequency and cut it, again with a very narrow cut. Might drop it just 1-2 dB, but sometimes more. 6 dB? I usually try to keep it subtle (3-4 or less). As you do that on different instruments, try to not do the cuts in the same frequency. So, if EG1 has a cut at 400 Hz, preferable don’t do a cut there on EG2. Might even boost EG2 there; if you cut EG2 at 700, maybe boost EG1 there. Just a dB or two. Keep it subtle.
Then go to your busses and scoop out some space in the low mids. Slightly wider but very subtle cuts. Do the same on your mix buss.
Drums can muddy things up as well. A ton can be done with EQ on each of the kit pieces. More than I can comment on here. I’m just learning this myself. Watch out for room mic tracks. Overheads can introduce a lot in the low-mids also. Often need a little cut there too.
Watch your reverbs and delays! Put an EQ on those babies as well. A HPF on my verbs especially is pretty common fare for me. They muddy things up. Yeah, watch your FX.
Rob Mayzes (Musician on a Mission) has some cool tutorials that are free. Here’s one on mud.
Recordingrevolution.com I’m sure will have some good stuff on this as well.
Hope that helps. So most of my comments obviously are on the mixing process, but if you are recording your own stuff, really look at your room.
2 Likes
Wide open question. Could you post a song in bash. Folks here are so talented. I fight with acoustic guitars vs vocals all the time. Have you tried playing one track at a time and try to determine the culprit?
Anyhow, I am the least talented in mixing. Nice to meet you
Whether you are recording live instruments or using samples, if they have been captured using any type of technique that involves close-miking, there will be a tendency for the lows and low mids to build up as those sounds are layered in your recording.
There are a.couple of reasons for this:
Close-miking generally results in what is known as the “proximity effect” where lows and low mids become emphasised the closer a mic is put to a source. This effect is often deliberately employed to capture a larger than life sound from a source (eg: kick drum).
With close-milking, not only is the sound of the source captured, but so are the room resonances. If the room is small or otherwise not an ideal space for recording, those resonances will often manifest in the lows and low mids, resulting in unpleasant overtones often described as “muddy” or “boxy”.
Now, while these captured sources may sound “big” and “fat” in isolation, when multiple elements captured this way are layered together in a production, the result is a massive buildup in the lows and low mids.
Another acoustic phenomenon known as “masking” comes in to play in this situation. The buildup of lows and low mids from elements that aren’t typically prominent in these areas (keyboards, guitars, vocals etc) starts to cover over or “mask” the lows and low mids in instruments that are (like bass and drums).
If no attempt is made to reduce the buildup of lows and low mids on individual elements, the result is a muddy, boxy, murky mess, with no real definition in the lows, mids or high end, which sounds like what you are experiencing.
The thing to remember when mixing is that an element or instrument that may sound good in isolation often will not work in the context of a mix of many layered elements. Each element needs space to “speak” clearly in the frequency range that is important for that element. Crafting a spot for each element to speak clearly is really what production and mixing is all about.
4 Likes
Some great advice here. One of the first lessons I learned from this group when I was getting started is to high-pass virtually everything. It is so easy for those lows and low-mids to build up. For acoustic guitar, for example (which much of my stuff is built around, since that’s my primary instrument), high-passing with a cutoff up to 500Hz or even higher works well when all the other instruments are in the mix, even if in isolation it sounds really thin.
And cutting out very low frequencies from sources that aren’t intended to provide any energy down there (guitars, vocals, keyboard, pretty much everything except bass and kick and possibly toms) removes buildup where your ear really can’t even hear it, but where taken together they really mess with what you want to come out of that part of the spectrum.
Great question!
4 Likes
Lots of great responses and suggestions so far. This article in Sound On Sound magazine talks about “Mix Mistakes”. The author identifies the problem you are having, and some methods to deal with it here:“Mix Mud”
3 Likes
Bookmarked…thanks
Wow Dave I cut under 200 for acoustics, I am way off the mark. Great posts for the average song writer.
It depends on what else is in the mix. If it is just acoustic guitar and vocals, for example, 200 would be a good choice. But when I have a bunch of other stuff going on, I get pretty aggressive on the high pass. When other instruments are occupying the sub-800ish area, the parts of the sound that are really important for an acoustic guitar (more toward the midrange) still come through well, and you’d never know it’d been cut as much as 500. One size doesn’t fit all… 
1 Like
I agree. Some disagree, but I think this is sound advice. The more instruments you have the faster things can pile up. They’re all competing for the same frequencies (well, not “all” but the primary band instruments – keys, guitars, drums, etc.) and it needs to be cleaned up. The other piece, as Dave said, is that especially when there are a lot of pieces to the band, you can pull your HPF up pretty high and not notice it. IDK that I ever get up to 500, but I often get up to 400 with my guitars, esp if their crunchy electrics. I’ll experiment going higher, though, cuz I trust Dave! 
So I forgot to comment this in my post above, but when you’re pulling those HPFs up for your guitars and keys, etc., do it not soloed, but you’re listening to the whole mix while you’re doing it.
1 Like
One thing to remember about high pass filtering (HPF) - or “Low Cut” as it is sometimes called - Is that how much low end is cut depends not just on the “corner” frequency, but also on the “slope” of the filter.
For example, here are two versions of the same acoustic guitar recording, both high pass filtered at 98hz.
BIG difference in sound, and the amount of lows being cut…
The first HPF has a slope of 6dB per octave:

The second has a HPF slope of 48dB per octave:
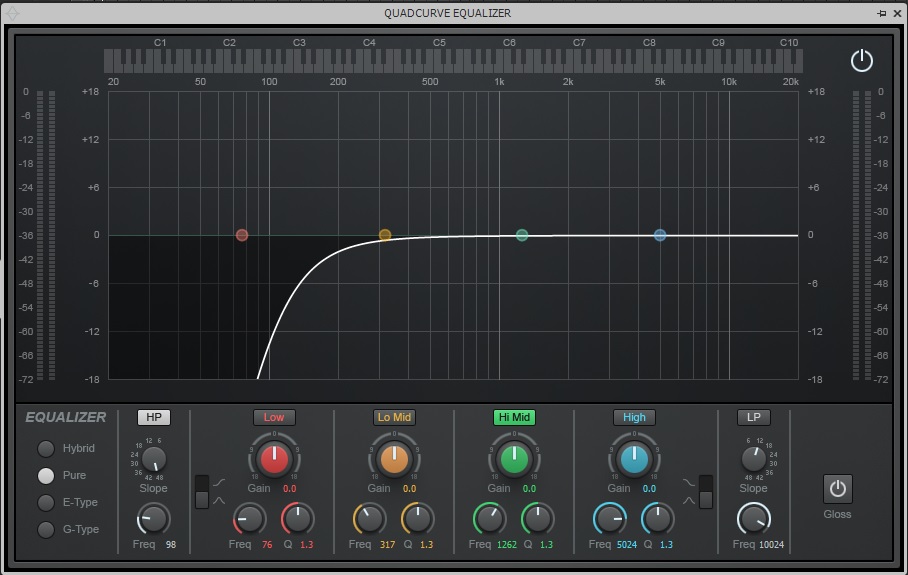
Often eq plugins have set HPF slopes, or they are set to a default, and the controls to adjust the slope aren’t readily apparent… Just one thing to keep in mind when quoting figures for suggested HPF settings.
2 Likes
I do the second one. Why have any of that real low stuff anyway?? Isn’t that where the bass and kick play? ha ha
Amen! I should have mentioned that too. I tend to use pretty steep slopes, in general… again, depending on what other instruments are in there. Great point Andrew.
Sound advice…!

1 Like
Can I just add that, yes, you probably need to add top end to almost everything, and not with ugly, overly bright sounding, cheap mics from china or wherever…
However, you should take care not to put consistent dips in the low midrange on multiple sources because they sound better in isolation.
I would suggest that you would utilize a tilt eq or some similar EQ, instead. This would give a more equal response over the tonal spectrum.
2 Likes
I’m just curious, because I use a lot of libraries from Kontakt, and some have a clean low mid and its easy to work and mix, the others, not much.
Thanks for the tips. Sadly i usually record soundtracks, so i don’t usually have too much freedom when EQing. Last time had to give up mixing a nylon guitar recording because the only way to make it less muddy was by using the low cut, but since it was solo music, i ended up losing all the body of the track.
Too much in 300Hz - 600Hz area. See Andrew’s excellent reply to understand how those excess frequency levels got there in the first place, but ultimately, ‘mud’ = 'too much mids".
May I respectfully suggest changing your mindset. If you don’t want to cut your mids, then you are going to have muddy recordings. So something has to give way.
Put your recordings on a frequency analyser, note where the excesses are and use EQ to pull the frequencies down to levels that are near to those of the other frequencies. It’s as simple as that. If you don’t like the result, give your ears a chance to get used to it, then do A/B tests with the muddy version and you will soon hate the original. (Make sure you compensate for the lost level in the newly attenuated version first!)
1 Like
When I compare the stuff I used to do years ago, to what I produce nowadays, I can say two things changed my mindset.
Firstly, I was convinced by wiser people that your mix lives in the midrange. That’s the place that pushes a song forward, so the more you put in that range, the more you have fighting for people’s attention, and the more crowded the mix will sound.
Secondly, I try to get my sounds separated at source, rather than in the mix. I’m already cutting the bass and the guitar frequencies appropriately before I lay them down. In other words, I’m trying to EQ my sounds as they go in, so that I don’t have to go crazy with the EQ afterwards. I know the guitar shouldn’t have deep bass, so that’s cut. I know where a synth is going to overlap on the bass and guitar, so that’s cut before I record it.
3 Likes
Never be afraid of hp.Try to listen not in solo.Sometimes i i find myself hp keys and guitars as high as 300-400 hz sometimes. If it sounds good do it.
Thanks for the tip, when I have I lot of instruments, I do this. The real problem comes when I have to mix tracks with 2 or 3 instruments, which is very common to me. So, sadly I can’t hp that much in these cases.