Reminds me of the time the busdriver was pumping on the gas, which inspired me to come up with:
“Fuck the streets, im trying to eat”
Interesting to get the “Into the Lair” viewpoints. Thanks!
1 Like
It brings such an added dimension for me, to expand on the process plus it’s awesome to be able to hear some of the less-processed parts to fill in the gaps. I think it’s also the one-man-band type thing where we have to be so multi-skilled it can feel like an exhausting journey sometimes and it’s just so cool to share in the creative journey of others.
1 Like
Thanks guys/gal! It’s good to know there’s someone listening/reading!
1 Like
Yes, thanks everyone. It is a long, but rewarding process. As I said previously, it’s great to be able to sit back after all the raw files are done and let Andrew piece things together. The two stages are very different, and I really appreciate how much goes into the mixing side, which is it’s own art form. I’m floored by people who can do both well, and I’m slowly getting there, but I also want to hear some of my stuff done right before they wheel me off to the old folks home.
4 Likes
Part 2 - Mix Prep
Bob was now ready to send me the tracks. We did this via Dropbox. which actually didn’t go as smoothly as I’d hoped (mainly due to my suggestions, given in the hope that I could keep some room in my rapidly ballooning Dropbox), but we got there in the end.
Initially the session included a total of 21 tracks - As a mixer, I love seeing a concise and economic use of tracks - it’s generally always a good sign. Tracks were as follows
9 Mono drum tracks:
kick, snare top, overhead left, overhead right, hihat, rack tom, floor tom 1, floor tom 2 & a mono room mic
1 x Bass DI (I didn’t see the reamped track Bob mentioned above)
5 x Guitar Tracks - 2 main rhythm tracks, 2 “colour” rhythm tracks & 1 Lead Solo (I didn’t end up using the DI track - these were all mic’d amps)
5 x Vocal tracks (1 lead vocal, 1 double track for choruses & other parts & 3 harmony vocals making the 3 parts of the chorus vocals)
& finally 1 “Bourbon Bell” percussion track (a bourbon bottle hit with a stick in the fashion of a cowbell)
Of course, Bob went craaaazy and added a staggering total of 3 more tracks by the end of the mix, but that wasn’t my fault at all, na ah!  More about that later, though.
Mix prep is a tedious, but vital step in every mix. It’s where I try to get all the non-creative stuff out of the way, so that eventually, I can just come in, open the session and start mixing. It usually takes me about 2-4 hours in an evening after work to do.
First, I import all the tracks into a new, clean session in Reaper. I listen down to a “faders up” version of all the tracks together, maybe soloing different tracks briefly as it plays to check everything is there that was in the rough mix.
Next, I colour code and label the tracks in my own personal nomenclature.
Usually at this point I put in markers indicating different sections of the song, so that I can move around quickly from part to part. This works fine if you have a constant tempo, as all the changes usually occur on downbeats of a bar. However after inputting the tempo Bob had given me into my DAW, it became clear that there was some movement in the tempo over the duration of the song. I tried a few close alternatives - slightly faster, slightly slower, but nothing was really nailing it down. I then decided to create a tempo map, based on the drum track.
Luckily, this is a piece of cake to accomplish in Reaper. It involves just using the “tab to transient” function to split the drum track up into bars. It’s then simply a matter of selecting the time signature, the number of bars being analysed, the specific bar length in the timeline, then getting Reaper to run the “Measure from Time Selection (Detect Tempo)” routine. It probably sounds more involved than it is, but the whole song can be done very quickly. In fact, if I was doing that specific series of actions all the time, I would probably program a “custom action” (something like the equivalent of a “macro” in word processing) to speed up the process even more.
Why go to all that trouble? you may wonder… In addition to having markers easily laid at the beginnings of bars, there are other benefits: Editing parts and moving them around is easier and faster to do at just a glance. Probably most vital to me is that, since I tend to use a LOT tempo-synched delays during mixing, I don’t have to think technically about their exact timing while I’m in the creative mindset. As I said before, the mix prep stage is where I get to deal with all this technical stuff, so I can (hopefully) just think musically during mixing.
With the tempo map in place, I could now insert the place markers in my timeline: Intro, Verse 1, prechorus, Chorus etc. Again, ease of zooming around the session in mix mode is the goal here.
What next? Gain staging & my “faux analogue” workflow. I’ve written about this before, but for rock-style mixes, I use Slate’s Virtual Tape Machine & Virtual Console Collection to emulate a traditional analogue signal chain in my DAW. This means putting an instance of each on each track in the session before the signal hits any other plugin. Why? I like the sound, and I find it actually gets me to where I want to be faster come mix time.
A beneficial byproduct of doing this is that it allows me to gain-stage the tracks I am given, so that, with my faders around 0dB, I’m not pushing so much level into the master fader that it’s clipping. Since the Virtual Tape Machine is the first in line, and it’s VU meters are calibrated to hit 0 at -18db RMS FS, it’s easy to go through the individual tracks and turn the level going into the plugin up or down to get it to sit in the “sweet spot”. This is very important for me, because I use a lot of emulated analogue plugins, which start to sound nasty if you hit them with too much level.
Next, I move on to the “money track” - the Lead Vocal. With Bob’s vocals, here is where I get to skip a usually very time-consuming step - tuning the vocals. He doesn’t need it - Killer pitch for a self-proclaimed, self-deprecating “shouter”. To quote Bob: “I just scream in tune”, with the emphasis on the IN TUNE! … So no Melodyne needed here…Next!
Bob’s mic technique is excellent - the dude knows how to work a microphone. That said, his style of singing is, by nature very dynamic. Without the benefit of outboard compression being “baked into” the recording on the way in, I usually find it very helpful to even out the vocal track in it’s raw state before I start processing it with anything. Reaper has a function where you can chop a waveform up into smaller clips (which automatically crossfade at the cut points). There is a little “volume knob” on the LH corner of each clip. It’s simply a matter of going through, looking at the waveforms by eye, chopping up any sections that are lower/higher than the overall average, and then turning up or down the volume knob on the clips in question until all the parts are roughly even. If you can’t picture what I’m talking about, here is a picture of one of the lead vocal sections:
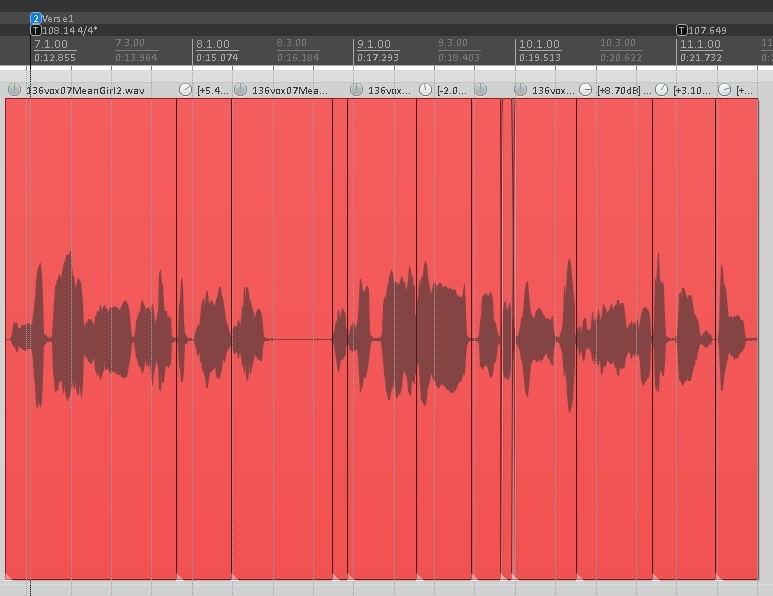
Of course, it’s important to check all these edits by ear and ensure massive gain changes don’t occur in the middle of words etc. Another way of doing this type of thing is with what is called “Clip Gain” in some DAWs.
Ultimately, I find evening out the gain prior to processing makes for much smoother compression and better end results.
Following this, I went to work on the drums. Again, I left the drum timing unedited, as the natural human feel really suited the material. As a personal preference, with up-front rock drum sounds, I like to really tightly gate the close-miked sounds. This is easy to do manually on toms. Since they are played only every so often in the song, I edit the waveforms and remove the “dead space” between the tom hits. Rarely have I found musically useful spill in open tom mics. With “tab to transient”, this is easy and quick to do in Reaper. In the end, the tom tracks looked like this:

I also used the “clip gain” method I described for the vocals on the toms, turning up the quieter hits, and turning down the really loud ones.
The kick and snare are a different story though. The snare in particular, can be very difficult to gate accurately, and automating it to not have mis-triggers can be very tedious. A few years ago however, I came across a method that I have adopted to my way of working. I duplicate the snare track, then instantiate Slate’s “Trigger 2” plugin to trigger a very bland, highly transient sound - usually a one-shot, full velocity side stick - from each hit. This sound is never heard, as it is sent to the side chain input of the gate that I put on the original snare track. Now the gate receives a consistent “open” signal of consistent duration and volume. Now, if some hits aren’t being detected by the “trigger” snare track, I can simply chop them and “gain” them up. If a loud crash or tom has bled into the snare mic, by simply manually cutting it out of the “trigger” snare tracks’ wave form, the gate on the snare being keyed by the “trigger” track will remain closed… Perfectly clean gating, even on the lightest of grace notes.
The big advantage of this is when it comes to processing the snare - as you’d see, I get pretty radical with eq and compression of various types. Clean gating enables you to do this without fear or compromise. I used the same method with the kick, although it was less fiddly than the snare.
A side benefit of using “trigger tracks” is that I now have a ready-made sample-layering facility, should I need it further down the mix. I simply duplicate the “trigger” tracks, delete the ‘side-stick’ sample and insert whatever flavour of drum that I desire to enhance the recorded drum tracks.
The article that originally gave me the idea to use this method was this one:
http://www.soundonsound.com/people/inside-track-tom-lord-alge
We’re almost ready to go mixing. Just a case of going through and finalising the routing of the project. I don’t use folders in Reaper. I just create group tracks - A group for snare, kick, toms and overheads, all routed to a “drum buss”, which is in turn routed into a “drum master”, in case I want on of the drum elements to bypass my drum buss processing for some reason later on down the track. The “drum master” also enables “macro” automation of the drumkit as a whole. There is also a group track for rhythm guitars, one for bass (I triplicate the bass track - more on that later), and one for harmony vocals.
All these feed into a track I call a “Premaster” which in turn feeds into the final master output of my DAW. Why? The premaster enables me to drag reference tracks into the project and not have their signal being affected by the processing I have on the “premaster buss” which will eventually include compression, eq and limiting. I can put my frequency analyser, my RMS meter and my LUFS meter on the master buss, separate from my “premaster” processing to allow 1:1 analysis with my reference tracks.
Next: Onto the mix!
8 Likes
@ColdRoomStudio Errm. Why have you written the same long piece twice in a single post. It is incredibly disconcerting. Interesting stuff, but waaaaaay too much to sit and read.
Thanks mate - I love you too  Its what’s commonly known as a mistake. Made by humans like me more often than than I’d prefer… I shall fix it now.
Good post! Looking forward to read about the mixing process!
1 Like
Thanks mate - I will try to keep it coming.
2 Likes
Part 3 - Basic Drum Mix
With the mix prep done, I was unable to get back to actually mixing the song for a couple of days, due to life and other commitments. I don’t mind this really, because it allows me to come back with fresh(er) ears.
My first step was to do a rough balance of the entire mix in mono, just using the faders and no other effects. Once it sounded reasonably balanced overall, then I panned things out to where I imagined they might sit best in the mix.
One of the interesting things I’ve learned about doing a rough fader balance in mono is that it’s a lot easier to balance the hard panned elements (like guitars) with the central elements (drums, bass, vocal). If I start my balance in stereo, I usually find that I have a tendency to under-mix the guitars. Usually, this gets redressed when I reference my mix against a pro mix. This is mainly down to how pan law affects our perception of levels, and I’ve found that since I started doing the initial balance in mono, my guitars end up being pretty much spot on once I pan them out.
With the rough balance done, I muted everything except the drum tracks. I spent a little time checking the phase relationships between the drum mics - First left overhead with right overhead, then kick with overheads, snare with overheads, and so on. Everything seemed to be pretty much in order, so I moved on.
The overall “sonic ballpark” I started out referencing was The Black Crowes “Warpaint” album from 2008, for example:
https://www.youtube.com/watch?v=w2Llu7Jjo_0
However, I ended up feeling that it sounded a little too “soft” and “mushy” for this particular track (sonically, not musically), particularly compared to the tracks I had already mixed for Bob…so I ended up aiming somewhere in the middle of those 2 points.
Starting from the overheads and room mic, I focussed on eq. At this stage, I listened for any undesirable frequencies and resonances that might impede the overall drum sound - usually in lows and low mids - and just cut them using Reaper’s stock eq. Once I had them sounding good to my ear, then I moved on to “polishing”. On pretty much all the drum mics, I used Slate’s Virtual Mix Rack, which has a great choice of compressors and eq’s.
With the overheads and room sounding punchy and vibrant as could be expected, I muted the room & listened to the kick with the overheads. Again I brought in the stock eq to pull out any nastiness I was hearing - In this case, some fairly heavy cuts around 200hz and 450hz. Next, the polishing with VMR - Cutting everything below 40hz and some further cutting at 400hz, a hefty boost at 4k to bring out some smack, a little boost at 100hz and 10k to bring out the extremes. Then into some compression - around 5db of gain reduction at a ratio of 4:1 on. I also used a little top and bottom “sauce” from the “Revival” saturation plugin, and the “Custom Lift”.
However, the kick was still lacking the consistency and punch I really craved hearing. The playing of the kick was actually pretty dynamic, so each hit varied in tone quite a bit even after eq and compression. I decided to bring out one of my favourite “instant punchy drums” tools, Boz’s +10db Eq/compression. The magic 25ms attack setting, 5:1 ratio, and about 10db (appropriately) of gain reduction followed the EQ with a 60hz boost, more 400hz dip, a 3k and a 6.5k boost. Kick done (for now).
The snare had a similar processing chain ReaEQ for cuts at 314hz and 512hz to tone down a resonant “boiiing”, then VMR with boosts at 2k and 7.5k, and a cut at 408hz. This was followed Custom Lift for a fair bit of “presence” boost, then 3dB of gain reduction from a compressor set to 4:1, some “thickness” and “shimmer” saturation from Revival. At the end of the chain, a little more 400hz cut and a narrow, deep 495hz cut to tame some resonance that was annoying me. Next came Boz’s +10dB compression and eq. - Same attack setting as the kick, but with 3dB of GR at a 3:1 ratio. The final eq had a boost at 163hz, a cut a 554hz, and further boosts at 3.5k and 7k. This comp/eq combination is killer for getting that in your face punch and snap from a snare.
On to the toms: The process was the same as the other close mics - ReaEQ first to cut the muck. These toms sounded great compared to a lot of the raw recordings I’ve heard - well tuned, with a lovely open sustain to them. Still I usually find toms need a LOT of reductive eq, usually in the 200 - 500hz area. In this case, some of the toms had up to 8dB of cut in this area. I followed this on each of the toms with more VMR, adding EQ and compression. The eq involved boosts to the lows, targeting the resonant fundamental “note” of each tom, some more broad cuts in the low mids, and usually a boost somewhere between 3k and 7k to bring out stick attack, depending on the drum. The compression was fairly gentle - about 3dB of GR at most. Finally, on the tom group channel I did a very gentle low cut centred at 40hz, as I noticed the low toms were activating the sub frequencies just a bit too much.
Moving back to the overheads, it was time to do some polishing to bring out the cymbals and even out the dynamics a little. Using VMR modules, I high passed them at 240hz, cut some boxy room sound at 570hz, ran into a compressor set to 2.5:1 ratio, medium/fast attack & release, triggering about 2dB of gain reduction. This was followed by further eq cuts at 400hz and 718hz. I started to notice a really piercing resonance in the high-mid to high range, so I chased that down with cuts at 6.9 and 9.9k.
The drums were sounding really punchy now, if a little clinical. Time to bring back the room mic for some character…
Room mics can be tricky. The excitement & sense of space and realism they add to a drum mix can be seductive, especially when you really over-compress them, smashing the transients and bring up the character of the drum sustain in the room . They are also a double-edged sword in that they can introduce a LOT of harshness to the cymbals. Fortunately, drummer Aaron is a not a cymbal basher, and the room mic had been recorded in such a way as to keep cymbal bleed to a minimum.
The room mic processing involved a 412 hz cut to take that boxy room resonance out, followed by a broader cut at 600hz to further clean up the low mids, and a boost at 4.9k to bring out some of the crack of the drums. I then smashed it into an 1176 compressor emulation set to 20:1, slowest attach, fastest release, with about 5dB of gain reduction, but working in parallel on about 75% of the signal. This was then followed by an 80hz boost to push the low end a little and bring out the beefiness of the kick and snare. The same annoying resonance that was in the overheads was present in the room mic. In this case, a fairly narrow cut at 6.44k seemed to nix it.
Then there is the hihat mic, which was mixed in pretty low, due to the fact that the drummer featured the hihat prominently in the way he naturally balanced himself. It was high passed at 173hz, a gentle shelf reduction at 7.5k, and a fairly wide bell cut at 7k to get rid of some harshness, followed by Revival with some “thickness” saturation and some fast/medium attack compression to tame the dynamics.
The overall drum buss processing was fairly straightforward: Gently boosting lows and highs with Slates Neve EQ emulation, and running into some fairly assertive compression at 4:1, slowish attack and fast-medium release, with gain reduction of about 5dB.
Here’s the original, raw “just faders and pans” drum sound:
And here is the basic processed sound we ended up with. There is no reverb or sample-layering present at this point:
Next: Getting to the finished drum sound.
4 Likes
Part 4 - The Final Drum Sound
It’s hard to write about doing a mix in strict chronological terms, since it is by nature an interactive, interdependent process - A change in any one area could affect many other things simultaneously. Hence, a lot of the changes I made to the basic drum sound I established at the beginning of the mix were made in response to the demands of other elements as they were introduced and the overall vision for the song. I’ll focus on these changes now, and try to explain why they were made.
Introducing additional ambience:
Since the drums have imprinted on them the space in which they were recorded, and the other mix elements were recorded in different spaces, often with little or no natural ambience on them, I looked for a “neutral” kind of ambient space that would be the basis to tie all these elements together as a cohesive sounding whole. This is a fairly subtle thing, but it does make quite a marked difference to the final result.
For this role, I used Slate’s “Verbsuite Classics” plugin running the Bricasti 'Studio A" preset which is a fairly neutral sounding room algorithm with a relatively short (548ms) decay.
Here’s the processed drums without room reverb:
And here they are with it added:
Subtle, but it forms the basis for my “cohesive room” tactic, which will comes into play later.
Another subtle effect was the actual reverb on the snare close mic. This was again Verbsuite with a Plate algorithm this time and a longer decay of 1.11secs. Here is that added to the drums:
Remember, I was going for a relatively dry-ish drum sound, thus the light touch with these processors.
Next, the toms - they really needed something to help them sustain and thicken in the stereo field. I ended up using 2 reverbs on them. The first was a Verbsuite room preset called “tom tom” that was fairly transparent, the second was from Valhalla Room’s Chambers algorithms called “GateDrumRoom”, which was a bit more colourful.
Here are those added in:
Problem Solving: Crash Cymbals
As the mix progressed, I began to notice that Aaron was so light when hitting the crash cymbals that they started to disappear as the mix became more dense. This is unusual, because most drummers I have mixed have the tendency smash the snot out of their crash and ride cymbals to the detriment of all sorts of other elements in the mix. So why not just turn up the overheads? I tried this, but found that the hihat then just became ridiculously loud in the mix. What about just automating up the crashes? While this may be effective for the initial hit, it’s almost impossible to keep the sustain of the crash cymbal loud without negatively and very noticeably affecting all the other drum sounds that are part of the overhead mix.
My solution was to add in some crash cymbal samples underneath the existing overheads. This was relatively easy to do. I just solo’d the overheads, opened BFD and searched for cymbal sounds that matched the respective crashes in the drum mix. A little bit of tweak of the pitch was necessary in one case, but then it was just a matter of triggering them via midi, putting them on their own tracks and feeding them into the overhead buss.
Sample Layering
Again, as the mix progresses, I find that the parameters change and you often need to look beyond just basic processing to achieve the sound you’re aiming at. It’s really hard for me to specify exactly why I chose to use the samples I did to enhance the existing drum sound in the context of the mix. Probably the best way to explain it is like painting a picture - You start with a basic shape, and then you use various brush strokes, shading, the pallette knife and other colours to help something come to life and be more engaging to the viewer (or in this case, the listener). It’s a pretty intuitive process, but I’ll do my best to explain it nonetheless.
In the case of the kick drum, I initially mixed in 3 additional samples. I felt the original kick drum didn’t have enough sub low end in it, so I found a nice, dry sounding 1 shot sample that had a solid fundamental around 60hz. I added another 1 shot kick that had a cool subtle slapback effect that enhanced the perception of loudness. The interesting thing with these 2 samples was that they needed their polarity reversing to work properly, which is a reminder to always check phase when adding samples. Finally, I added a completely ambient room sample from Slate’s Trigger 2 collection, again to add some bloom presence, and sustain to the existing sound, since the slower tempo really suited a bigger kick sound.
Later in the process, I decided to add yet another kick sample, this one having a really “sucked mid” sound to push both the lows and highs a bit more.
Here are those 4 kick samples added in:
Moving onto the snare, it was time to get a little less subtle. I was aiming to add some width, presence and “sound bouncing of walls” impression of loudness that the space in this songs’ groove seemed to demand. This involved 2 samples, both completely ambient in nature. The louder of the 2 was the room mic only sample of the Black Beauty snare from the Slate Deluxe 2 collection. I usually tune the sample to match the tuning of the original recorded drum, but in this case, they seemed to match pretty much spot-on. The second sample, mixed in just barely loud enough to be audible, was “gunshot” sample - the ambient tail of a gunshot sound. These 2 samples seemed to provide the sustain and space I needed. Here is the previous drum sound, now with the snare samples added:
I was pretty happy with that, but later on, after some great suggestions in BTR, I added a snare bottom sample to the mix, just to add a little sizzle and make the snare less “tom-like”. Here is that added:
Parallel Tactics
We’re almost there, with one significant part of the puzzle missing: parallel processing. Distortion and saturation can be wonderful tools in mixing. If a sound needs to be thicker, to cut through more, but not be necessarily “louder”, then parallel processing is a profoundly effective tactic. In rock mixes, I use it pretty much 100% of the time on drums. Additionally it adds character and grit - “un-sterilizing” the audio, which is perfect for rock.
Here’s the way I do it: I add auxiliary sends to the kick, snare & toms tracks that feed into a “parradrums” track with just UAD’s “Fatso Jnr” - an emulation of Empirical Labs famous hardware compressor/tape emulation/saturation/distortion device instantiated. I call up a preset called “Warm Crunch”, then crank the input control pretty much all the way up. I then solo the “paradrums” track and balance the send levels so that the balance is primarily weighted toward the snare, with slightly less toms, and the kick softest in the mix. Here is what the solo’d “paradrums” track sounds like:
You can understand why I am so diligent about gating my close mics. If there was stray cymbal bleed, or gates weren’t closing fast enough, the amount of gain and distortion on this track would make an ugly mess of that very quickly. Instead, what we get is “controllable mayhem”. It just adds that certain thickness, that excitement and character needed for a rock drum sound.
So here is that added in to taste:
That’s the completed drum sound on the track…
Next up: Bass
3 Likes
Thanks for sharing! Very interesting and inspiring reading!
Massive improvement on the drums!!!
Thanks Gustavo! Glad you enjoyed it…
The drums were actually really well recorded (& I’m pretty certain they were recorded at a pro studio), but that amount of change is necessary to achieve a sound that is comparable to what else is out there currently.
Part 5 - Bass
Listening to the raw bass track, although Bob had clearly done a superb job of playing it evenly and smoothly, I was initially concerned about getting enough consistent low end, as the bass part was played across both high and low strings, and up and down the neck. As you can hear in the raw DI, the tonality varied quite substantially through different parts of the song:
I also wanted to retain the clarity in those chorded bass licks, while retaining the midrange thickness and beef to cut through a rock mix.
I felt this was an ideal circumstance where my usual 3 pronged “multiband” bass processing would be put through it’s paces.
First, I established a full, beefy tone focussed mainly on the low and sub harmonics. This involved using VMR to supply eq with a generous low end shelf boost around 80hz, running into an 1176 clone with medium and slowest release hitting about 10dB of gain reduction. Here is what that sounded like:
I duplicated the same DI track, then added Amplitube’s Ampeg SVT-4 Pro amp sim. I was looking for a tone to really bring out clarity in the midrange, so the tone here is quite spanky and modern. This would help with those chord tones:
I copied a third version of the DI track and sent it to Guitar Rig’s Sansamp emulation (cunningly called “Transamp”) for some real gritty midrange distortion. To take the edge off it, I inserted an instance of ReaEQ following it and low pass filtered it at 3k. Here is that channel solo’d:
Mixing these together to taste and feeding them into a “Bass Buss” track, I first check that they were phase-coherent, then I did some further processing to the combined sound as a whole. UAD’s Neve 88RS channel strip plugin was first in line, with fairly high ratio compression pulling everything together with about 3dB max of gain reduction. In the eq section, I added a nice wallop of boost around 50hz, high passing the bass just below that boost. In the high mids, a full boost at 1.5k and a slight boost around 3k were made. I followed this with 2 instances of Waves Maxxbass. The first adding a little more harmonic in the lows, and another adding harmonics to the subs. After a few revisions, I did a few cuts to the bass with eq around the 100 & 200hz mark.
Here is the completed bass tone:
And here is the completed bass in context with the drums:
Next up: Guitars.
4 Likes
O my… this is AWESOME reading, thanks heaps for taking the time to outline this… it’s inspiring and daunting at the same time… 
Loving the samples, they give such a clear demo that really gives an effective illustration… yay!!
3 Likes
Fascinating stuff. It’s like in every major post so far, there’s been one little trick I’ve never heard before and plan to try.
2 Likes
Thanks Emma!
Thanks John! Glad you liked it.
Wow, if I’d known you’d have to do so much work I would have played better. Seriously though, since you prefer raw tracks, would there be a benefit to me doing mild processing on the way in to make your life easier? For instance, mild compression for peak leveling, or is it better raw? I’m feeling like some of this could be pre production if you do it all routinely.
1 Like
That’s actually a really difficult question to answer categorically. Sometimes pre-processing can make life easier; sometimes it can tie your hands. A little mild compression and/or peak levelling would probably be fine on vocals and bass. I definitely prefer drums raw. Any added ambience is best to leave to the final mix too.