In the light of recent questions and interest, I wanted to share some of my Videography / Cinematography experience. I am not an expert in it and most of what I have learned is from example and experience. My dad is an excellent professional photographer (retired) so I picked up tips along the way. Though I did take basic film making course and put it to use .
Going to cut right to it, there are only 4 main things involved in Photography/ Film making in general. A good video camera will allow you to control these 4 parameters manually.
- Aperture
- Shutter Speed
- Focus
- Light Sensitivity (ISO/ASA)
They all allow camera to “drink” the light in their own ways. The final result of a combination of the above 4 is “Exposure”. In film theory, staying slightly underexposed is better than overexposed (too much light!)
Aperture is the opening and the first door to how much light you want in the shot, wider openings are brighter and smaller openings are dimmer. Shutter speed is how long your film stays exposed to light, slower speeds are brighter and faster speeds are dimmer. Focus allows you to focus on specific light zones and light sensitivity adds more light to whatever is already available based on certain situations. Each of them (in addition to drinking more light) adds their own unique character to the shot for example depth of field, lens flares and film grains.
ISO / ASA
How sensitive is the image sensor to light.
This is the most important aspect of film photography.
Lower number means sensor is less sensitive to light
High number means sensor is more sensitive to light
Lower numbers give more clarity and Higher numbers while allowing more light in your shot, adds video noise (overexposed grains).
It is recommended to shoot at the lowest possible ISO setting without being underexposed. Raise the ISO only if you have exhausted all other options like aperture, shutter speed, focus and external lights and still cannot get proper exposure or the proper shot character. Play around with each of these 4 things to get a feel for your camera. Its going to take some practice. Keep other parameters unchanged and change 1 thing at a time and see what happens. With enough practice you will get a feel for these settings. If the end result is clean, clear, well lit and in good focus - thats a job well done. Modern cameras have a lot of displays to monitor lighting. They can detect exposure in eV values of -2 -1 0 +1 +2 etc. You can also use zebra meters to detect overexposed zones in your shot.
Its time to gear up!
This is one of those times I recommend a semi professional or starter DSLR Camera over your fun camcorder or a smartphone. Get a starter DSLR camera with 12megapixels or higher. A good starter one that can take great HD footage while not breaking the bank is:
Canon Eos Rebel 500D / T1
There are many other DSLR bodies that are quite amazing, Sony Mirrorless DSLR lines, Nikon D5x series are all pretty darn good competitors to the Canon lines.
Try to find good deals with a stock lens, its a good idea to grab a stock lens for each of your cameras. They offer great versatility in a variety of situations where you need to be quick.
Lenses
In addition to the stock lens, I recommend grabbing a prime 50mm (f/1.4, 1.8 or 2.4).
These numbers are F stops that relate to the aperture sizes, smaller numbers are bigger apertures and are more expensive. Remember a prime lens is not zoom-able and is primed to a specific focal distance. A prime lens is significantly sharper than a zoom lens but is not as versatile.
Additional recommended lenses:
30mm (f/3.5) for extreme closeups
zoom lens
55-210mm (f/4.5, 5.6, 6.x)
100-400m (f/4.5, 5.6)
Telephoto lens
500-1000mm (f/8)
Lighting Kits
Softbox Lighting kits (3 point or single) OR a pair or two of good Fresnels with barn doors
Overhead Lighting stands for top light
An additional Spot Light for fill
Color filter inserts (warm, cool)
A few sheets of Diffusion paper for DIY soft boxes
A couple of reflector rings
Budget lighting
Rice paper lamp shades! Rice paper lamp shades are tremendously effective in budget situations.
A good tripod or hand held stabilization kit
Remote to start and stop recording
Video software
Sony Vegas/Movie Studio/Aftereffects or the likes
basically anything that can render MP4 HD video with AVC/AAC/MVC codec
Camera Settings
Once you get your camera, turn off all automatic shenanigans such as Auto enhance, auto color correct, HDR, skin softening, auto light adjust, auto focus etc. Auto focus or continuous focus can be used if in a rush but the rest is extraneous and a video software can do it a lot better.
Some standard Video techniques:
- Nature footage
- Lens Flares
- Bokeh and closeups
- Ambient Light footage
- Golden Hour
- Dusk footage
- Rim lighting
- Selective Focus
- Telephoto
- Dark room footage
Here are some of my stills from videos I have filmed. They are low resolution stills, the actual pics are very large and not a good idea to upload them here. I will try to address each still as a different photography technique mentioned above and add details and camera settings.
work in progress…
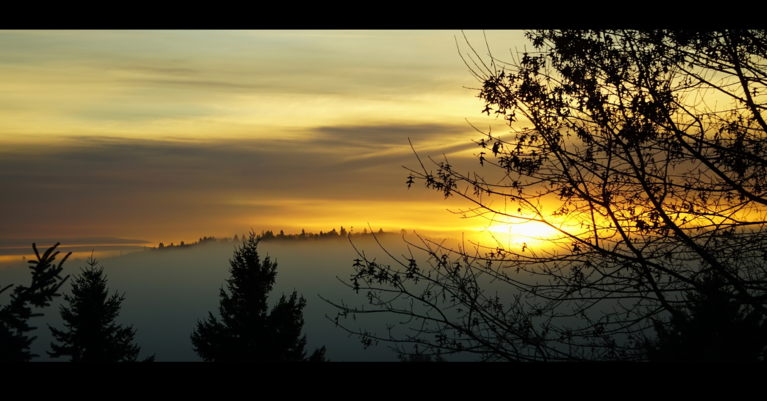
Golden Hour Videography
Golden hour is right before sunset or right after sunrise. Marked by its signature golden hues.
Light moves very fast, so you have to be ready to take the shot. An F stop of 5.6 is a good size to be ready for fast light moving conditions. Wider apertures can drink too much light and smaller aperture might not record enough light when light moves fast. Too big of an aperture will get blurry if your subject moves. As a beginner, its a good idea to start with medium sized openings like 5.6.
To frame the shot you have to face the sun with your subject between you and the sun. Idea is to record the subject and the light behind with as much detail as possible.
A shutter speed between 100 and 200 is a good starting point for golden hour. This allows the camera to drink just enough light without raising the ISO too much. Normally 400 ISO should be enough, if not go up to 800 but not more. If you want shallow depth of field (more blur) move closer to your subject.
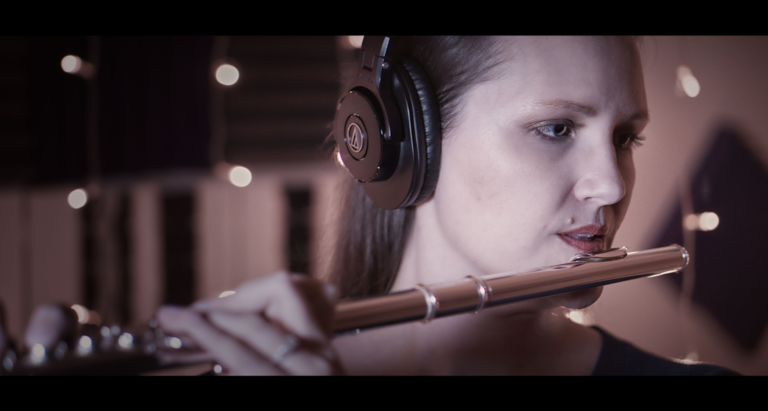
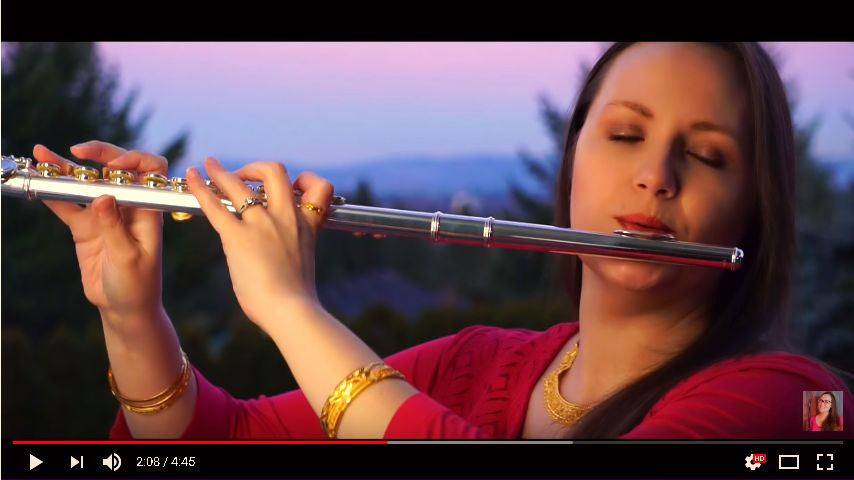
Ambient Light Videography
Ambient light capture (a.k.a candlelight photography) is the most commonly used technique in film making and is also a very popular look for YouTube. This is because of its sheer simplicity and elegance. Great for recording a solo artist in a studio when time is of the essence.
Needless to say, we need ambient lights in this case, these can be fireplaces, candles, draped strand lights, led lights, up-lighting, floor lamps etc. This is a dimly lit condition so additional soft warm light on the subject is needed. Preferably mounted to the camera or on a stand off to the side (preferably “dimmable” to control the exposure). This light should not be very strong or it could bleed into the ambient lights and destroy the shot.
We need just enough depth of field to capture the ambiance so subject should be within 8 feet of the ambient light. A stock lens or better can be used for this. An f-stop of f/5.6 or f/3.5 can be used. ISO of 400 or 800 should be enough. Stand close to your subject and start with a shutter speed of 1/48, then work your way up slowly (if needed) to get the right ambiance as it will differ drastically for everyone.
This video footage was taken at f/3.5 , shutter speed of 1/160, ISO 800 (exposure was controlled by a warm dimmable softbox light)
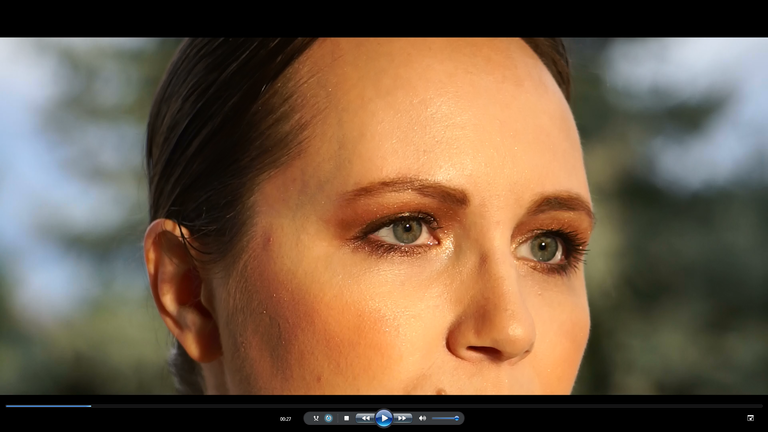
Bokeh (out of focus or shallow depth of field Videography)
Generally Bokeh refers to out of focus highlights (lens blurs) photography. However, term is often interchanged with depth of field. It is because altering depth of field can also create a strong bokeh effect.
Shallow depth of field is a very complex photography technique and can take a long time to master. This is because it is very hard to keep subject in crystal clear focus at larger apertures and it is very hard to control the lighting as well, because the aperture is open so wide, that too much light can easily trickle in destroying the clarity of the shot.
While camera phones of today boast that they can take these kinds of pictures and videos with point and click ease, a lot of that effect is generated via software and lacks clarity and resolution. When you expand the images you can see these artifacts. They get worse when rendered into a stream-able mp4 format. The kind of lenses required to take these shots are high quality and high resolution and need a very high quality image sensor. Those are simply not available on phones, at least not yet.
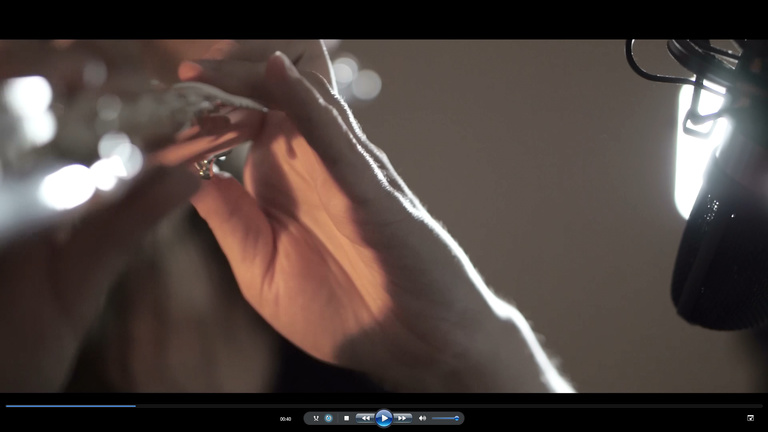
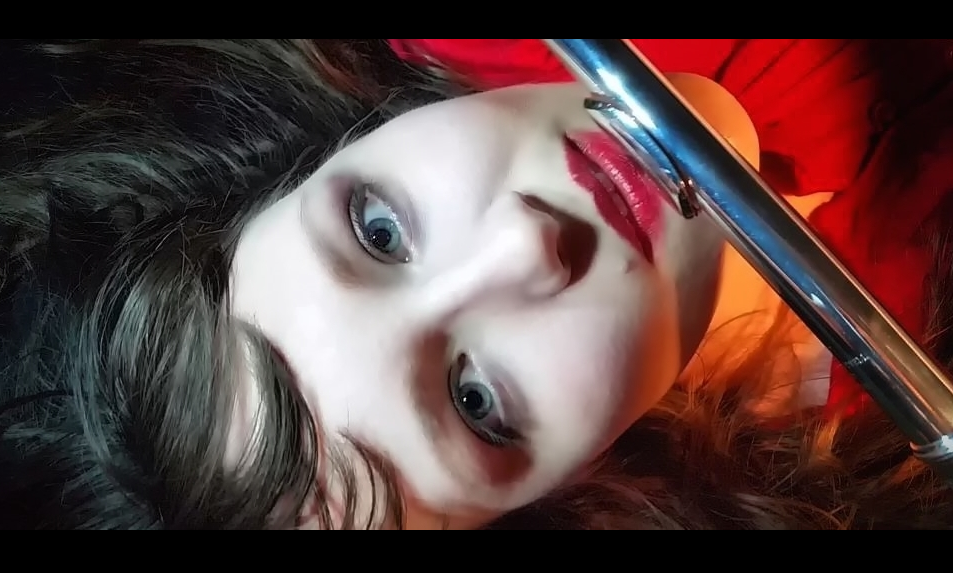
To get a shallow depth of field, you need a lens with a wide open aperture (normally a prime lens with 1.4, 1.8 or 2.8) This video (below) was taken with a 50mm prime lens, 1.8 aperture keeping the camera as close as possible to subject with background as far as possible. Shutter speed of 100. To get a very clear focus, focus on the eye of the subject, get it really good. Mark that spot and try not to move too much. If you are doing it by yourself, project your camera to a laptop screen and use a tripod and remote focus. If you don’t have a remote or tripod, have a steady hand friend help you, you can create all the settings and just have them hold the camera and press a button.
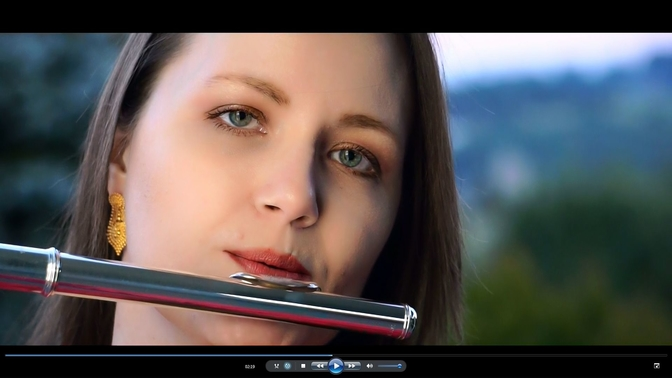
The type of light used is going to dictate the type of structural detail you capture. A diffused light is going to show less structure and a warm spotlight (hard light) can enhance finer details such as skin freckles or eye lash lengths. (Though I am not very good at makeup and my eyelashes arent as long, using a warm spotlight, I am able to enhance the detail) - fyi doing this with a heavy flute in 1 hand is rather funny.
Lens Flares and Aberrations
A lens flare is a simple and easy way to add a natural effect to your shot. Different lenses have different kind of flares, these depend on the shape of the lens opening diaphragm. An anamorphic lens was used to capture the elliptical lens flare. I chose this because original star wars used wide angle anamorphic lenses for certain signature shots. This is just for art and tribute. To capture a pleasant lens flare, keep shutter speeds fast 200, apertures relatively smaller f/8 or smaller (because your camera will be looking directly into the sun or bright lights). UV filters recommended and remote projection recommended so you dont damage your eyes.

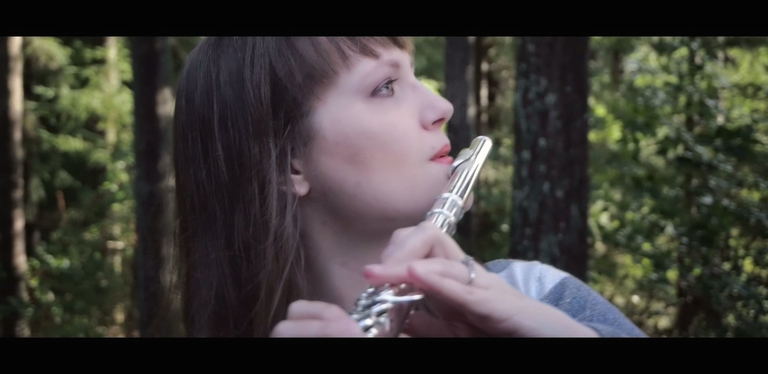
Nature Videography
Nature is a good place to record videos, the light is abundant and the greens make for good contrasts. Our job is to use the warmth and color of nature, without letting the greens drown out your main shot. This video was taken at f/8 with 1/48 shutter speed. ISO of 100 with neutral style -3(contrast) -3(sat) -3(sharp) . There was abundant sunlight that day and minimum ISO was just fine. If your camera doesn’t allow for style settings, don’t worry about it. Shutter speed of 1/48, low ISO and neutral tone creates a milky classic cinema vibe, while still maintaining HD clarity.
Dusk Videography (different than golden hour)
Dusk photography (after sunset) has signature purple and pink blueberry, strawberry like hues and is normally filmed on the opposite side of sunset horizon. Shooting at dusk is great for romantic shots. Lighting is quite low so medium apertures are needed 3.5 - 7 , slower shutter speeds are recommended (below 50) Subject needs to be lit with spot or softbox lighting as well (preferrably dimmable). Deeper depth of field is recommended to capture the hues of the backdrop. Try to keep ISO 800 or lower and adjust the external lights instead. Its tricky because external lights must not be too bright, which is why dimmable comes in handy to fine tune the exposure. It is ok, if the image is slightly underexposed. Any kind of overexposure even minimal amounts can bleed noise into the otherwise beautiful shot. This one takes some practice.
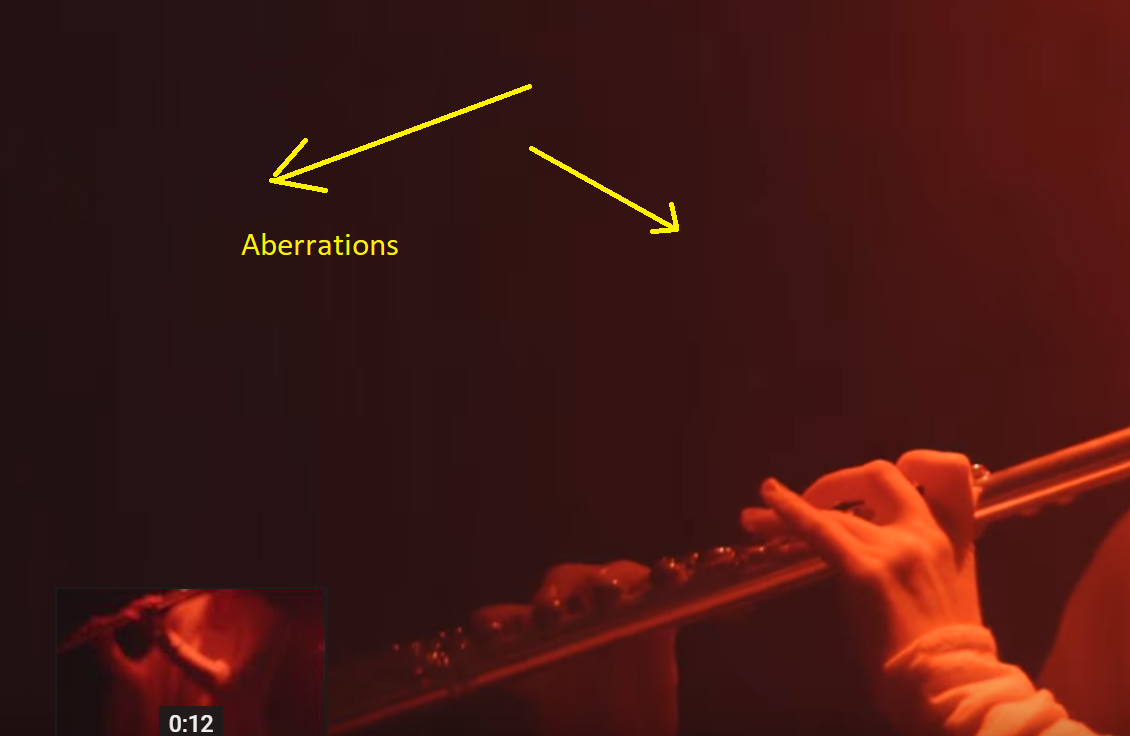
Rim Lighting
The edges (rims) of the subject is lit up by a strong background spot light. Usually shot in a dark room. Rim lighting highlights the body edges and lights up hair ends. Because details on the other areas are immaterial, we just have to be careful enough to not blow up the exposure or careful enough to not have an underexposed shot. An underexposed shot in a dark room can add blurry areas and overexposed can create a ghost like abberation (see 2nd image below) . I have seen this mistake in even the most pro videos. If image is overexposed, the dark room will look like a grey room where the greys and dark areas fight with each other causing abberations. Shooting in high contrast mode Style setting of +2 on contrast will help get rid of ghost abberations.
f5.6 , shutter speed 1/30 , ISO 400 was used.
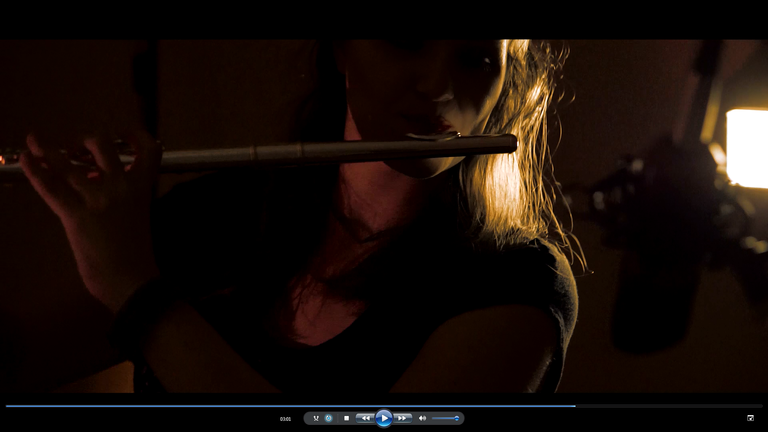
Ghost abberations from wrong exposure in a dark room (marked by yellow arrows below)
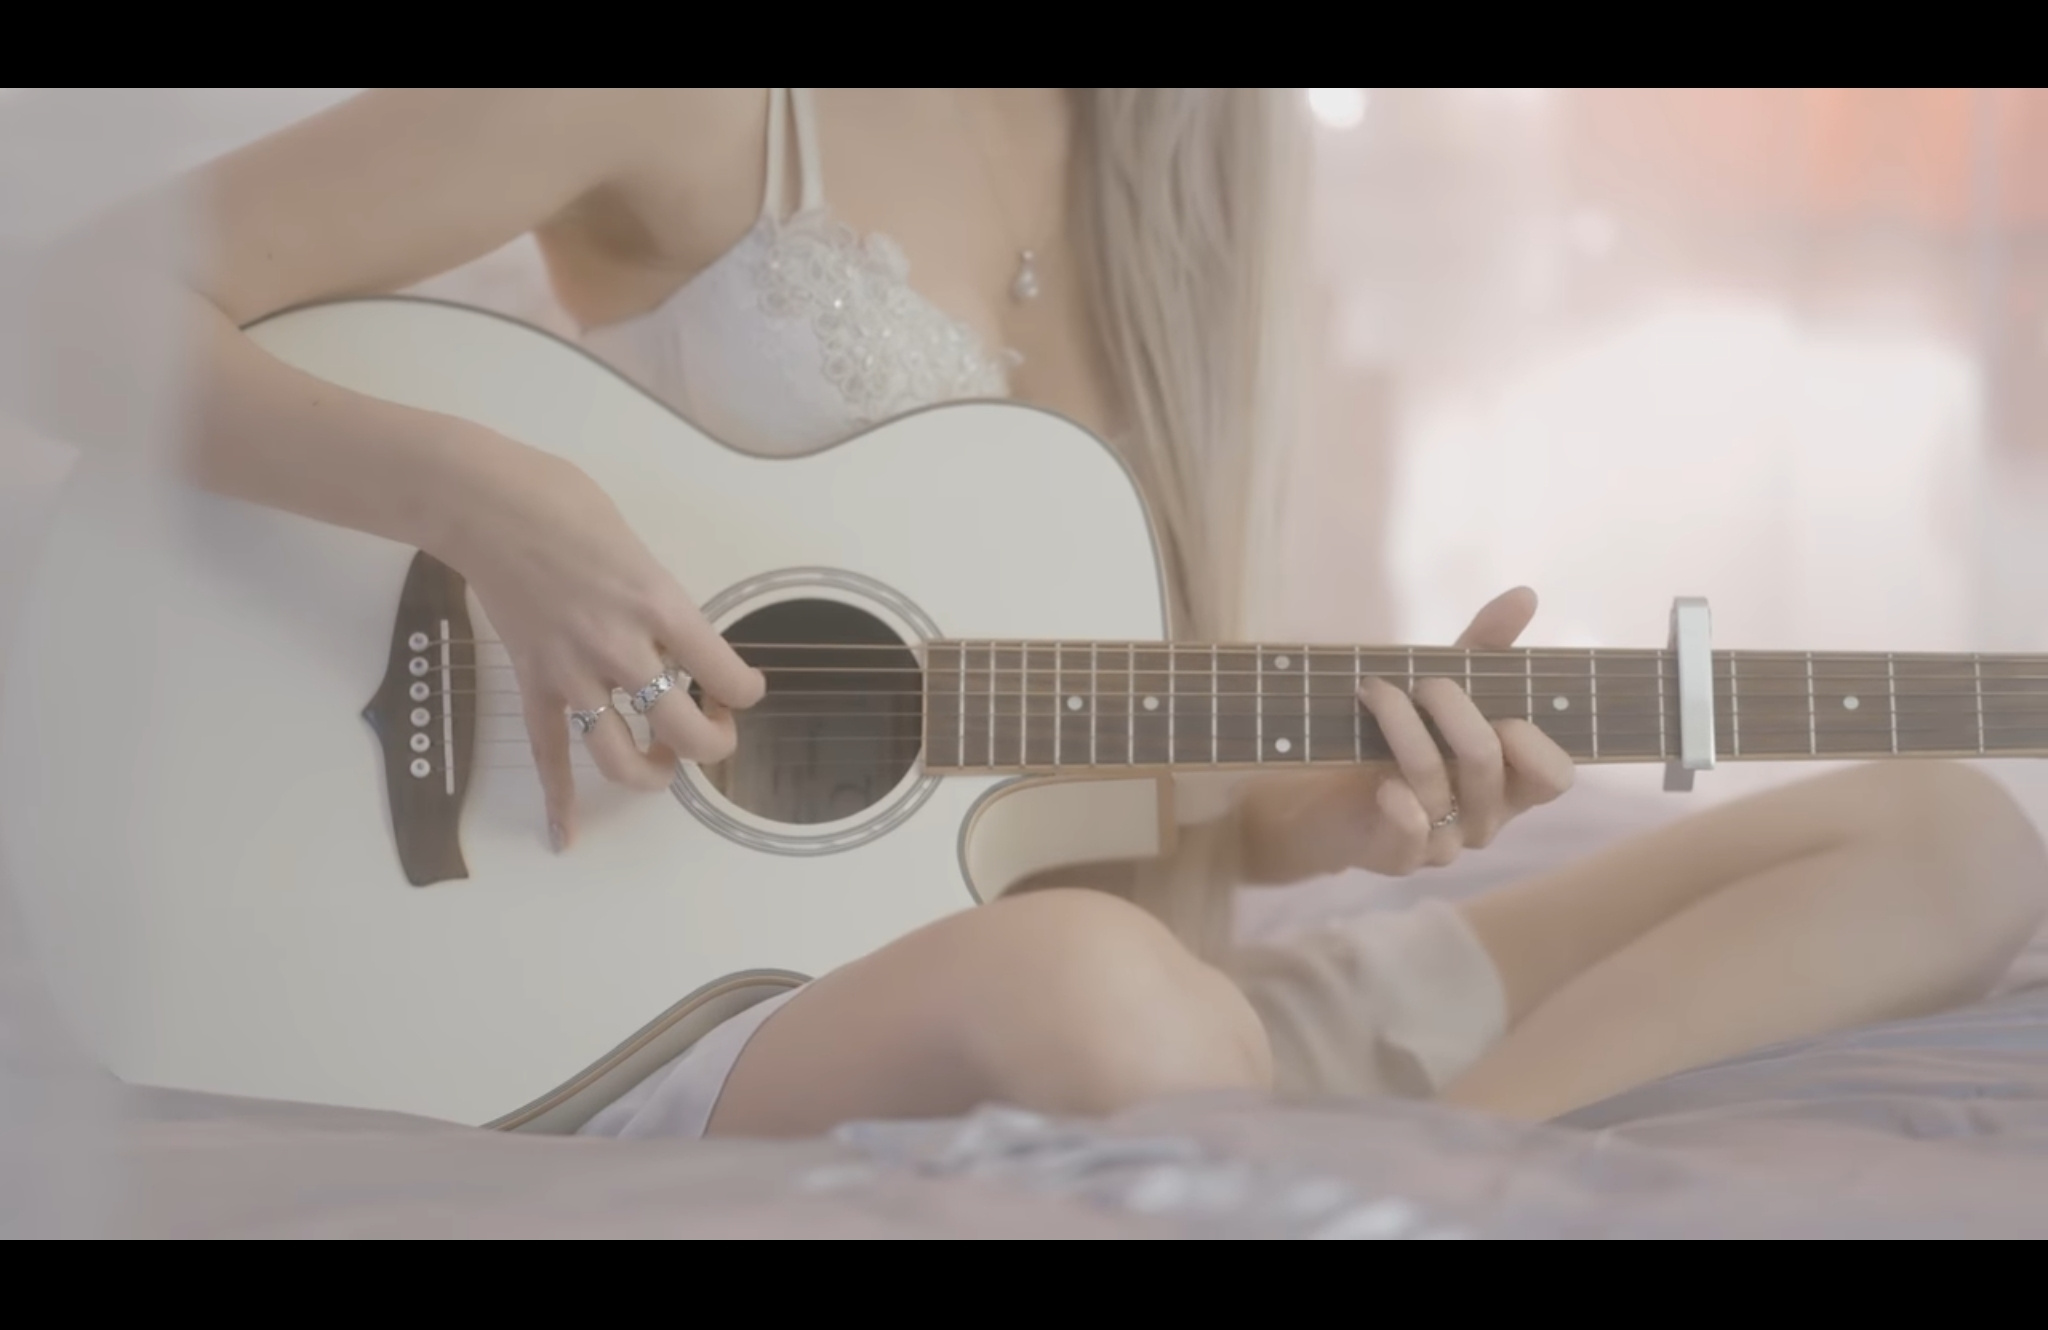
Selective Focus
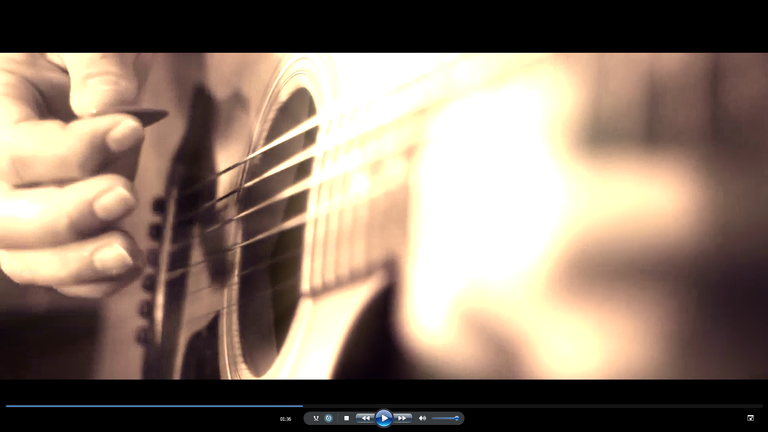
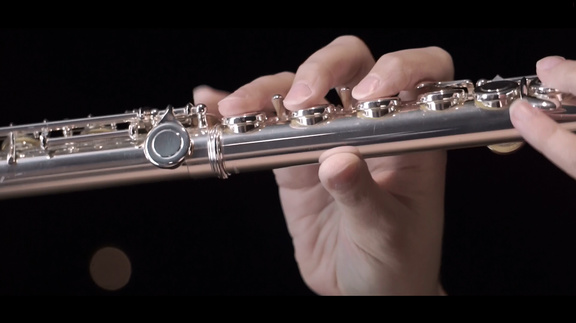
Certain cameras allow for moving the focus zones away from the center of the screen (skewed focus). Normally camera focuses on the center of the screen by default . With a skewed focus, you can designate what areas you want in sharper focus than the others. This comes in handy to highlight specific areas of the shot, for example fingers on a guitar or a piano, fingers on a flute while keeping most of the image as a blur.
This creates a very cool and professional effect.
30mm , f/3.5 , shutter 1/100, ISO 100 was used to film these shots.
Focus is shifted to the pick, rest of the shot is blurred. A spotlight was used to enhance the aesthetics.
Telephoto Videography
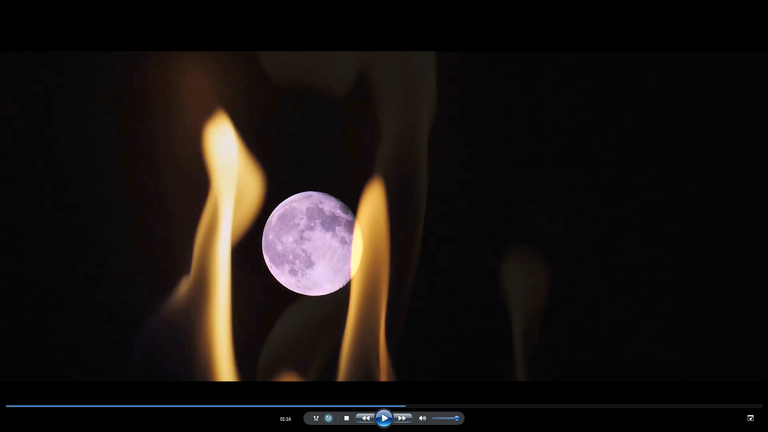
This one is pretty self explanatory, a telephoto lens is practically a telescope mounted in front of your camera. Telephoto lenses are great to take stock or filler shots. The shot below was taken from a 1000 mm, f/8 lens at a campfire. I wanted to take a shot as if the moon was on fire. I left my telephoto lens on a low tripod, peeking at the moon, through a fire. This one was a time-lapse shot.
Dark Room Spotlight Videography
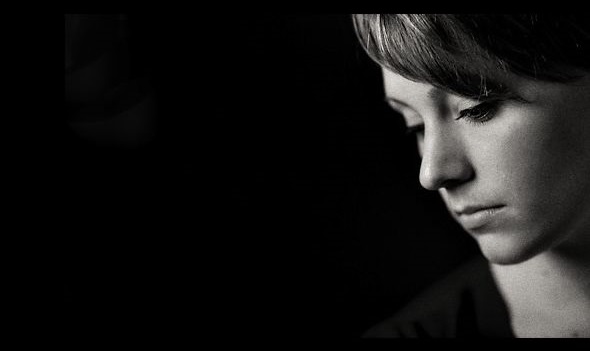
In this technique, subject is placed in a dark room with a strong spotlight lighting up just the subject. A shallow depth of field is used to capture the subject, this captures only the subject and the entire room is left dark. This is a great way to create simple, elegant and intimate settings. They can get very artistic in black and white with a bit of added film grain. 50mm, f/1.8, ISO 100, shutter 1/100 was used to capture these.
Turning these type of footage to black and white, with some added film grain can completely explode
in emotion. Its a good way to bring additional intimacy to the scene.
Video Editing
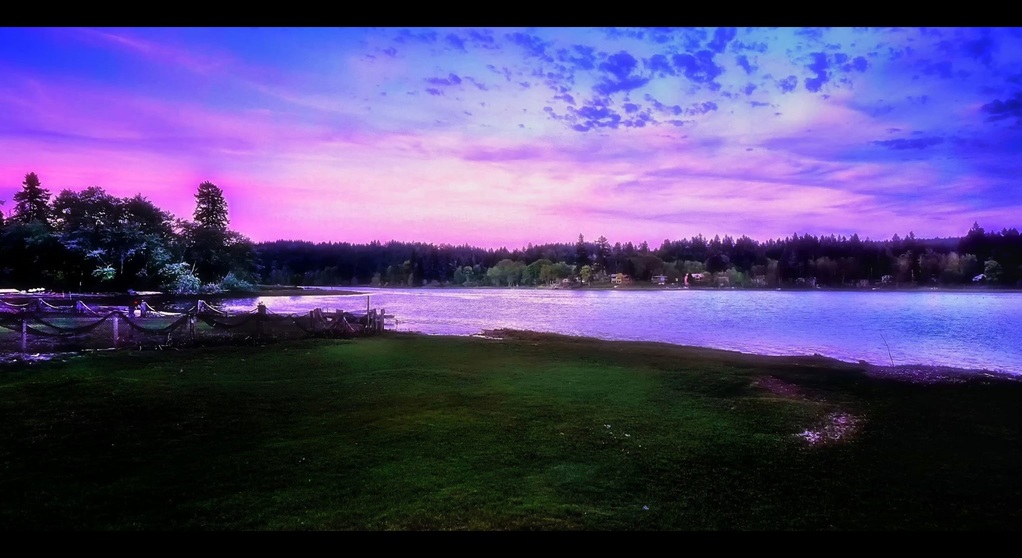
Video editing is great when dealing with rich details. For example, when shooting landscape at dusk, a deeper depth of field is needed to capture all the beautiful details. A video software can enhance such videos if the video is taken on a neutral style setting. A slight boost to the saturation and contrast can sometimes add magic. I also added a polarized light effect to this video and created layers of light zones. This gives a dynamic depth to the shot that varies at different parts of the scene, like land, water and sky giving an ethereal, fantasy like look. However, it is important to not over-do the effects as it is easy to destroy a beautiful shot.
f/12 , Shutter speed 1/100 , ISO 400 was used to capture this. The image was almost underexposed and I did not want to increase the sensor sensitivity anymore, but the clouds opened up just enough in time!
Aspect Ratio
Aspect ratio is another important aspect of videography. Most shots are framed just enough to highlight the important parts of the scene. Any extraneous details like too much wall, too much sky or too much backdrop can get distracting. Once the video is recorded, you can watch the video carefully to decide on a “crop”. The top and bottom letterboxes can define the shot boundaries. There is no magical aspect ratio, it all depends on the shots in the take. Sometimes, no crop is the best option and sometimes heavy cropping is the best way to go.
I usually use my hands to frame the shot most of the times. That way I can get a general idea of the aspect ratio before I am about to shoot the film.
This covers most of the basic video techniques, there are many others but these are a good starting point. Filming can get very taxing and frustrating and a lot of times it is easy to get stuck. Take breaks and don’t rush a shot unless you absolutely have to.
Good luck!
Michelle