Gain staging

Hi lads, I’ve got a question conserning gain staging.

I’m reading a mixing manual from “Ermin_Hamidovic”, maybe some one knows this guy? And I’m getting a bit confused with the gain staging topic. I’ll post a quote here first:

"There is currently no nominal level standard in digital workstations. Most plug-ins are configured to work around different operating levels, and most DAWs meter in dB Full Scale, which doesn’t consider headroom - it simply just chops audio past the 0dB point (in a none-too-pleasing way as well!).
More and more digital mixing engineers are adopting the old analogue workflow when setting up sessions in a DAW. The general notion is that a good quality, professional analogue mixing console has around 18dB of headroom beyond the nominal operating level. Consequently, many are adjusting their individual tracks to sit around -18dB on their digital meters, with the space above reserved for transient content and dynamics. This allows an appropriate amount of headroom to mix just about any style of music, as dynamically as one might need. I would recommend following suit. Furthermore, calibrating your AD/DA converters to this reference level for using outboard gear would be wise.

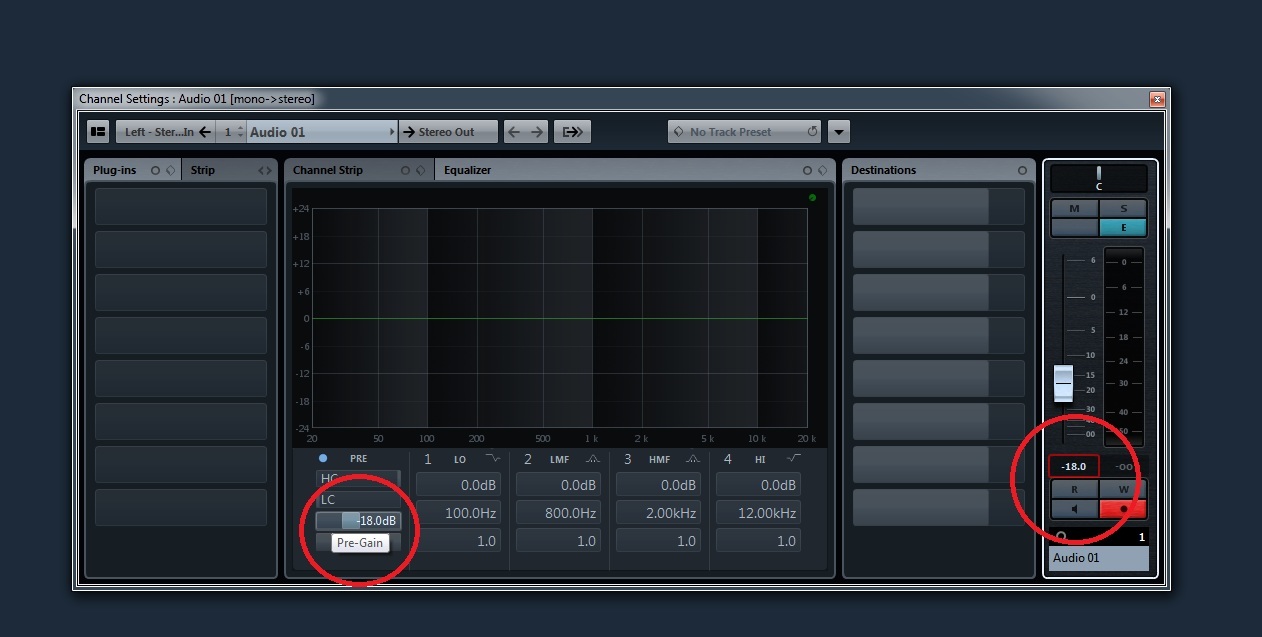
Adjust the gain using the gain controls/virtual trim pots on your DAW channel mixers (or trim plug-ins, in absence of inbuilt channel gain controls). The reason for doing this is that you want the level to be pre-fader, so that all your inserts (whether they be plug-ins or hardware) benefit from the increased headroom. This also frees up your faders to sit closer to 0, giving you a better visual cue of what you’re doing when mixing.
Now that our projects are all pre-routed and gain staged, we can move on to the fun stuff. But before we do, we need to visit one very important element in the mixing equation! "

Now back to my picture I uploaded. Does he mean the gain on the left, or the setting of the fader, or something completely different? If I had to choose from these two, I would think the left one. But maybe its somewere els in the chain, I don’t know :slight_smile:
This is in cubase so if possible speciffick info for cubase :slight_smile:

Can some one please clarriffy this for me :smiley:? Thanks !!!

note: This is not common knowledge to other DAW users but the channel strips in Nuendo are configured to where the first 2 slots are always pre fader, and the last 2 out of the eight are always post pan.

So I assume the point of the insert section gain staging is to control the levels going into the top of the plugin chain.

I’m not entirely sure about that though. Maybe someone else can confirm?

2 Likes

-18dB doesn’t mean you should adjust your faders or input trim to -18dB and call it done.

It means that when you record, a good recording volume to aim for is so that when your input trim (the left circle) and you’re channel fader (the right circle) are both at 0dB, the level of the signal flowing through the channel is around -18dBfs.

And that doesn’t mean that whatever you record, you set it to peak at -18dBfs. It means that this is the signal level you work around. So if you’re recording something that is fairly steady like a bass or distorted guitar or synth pad etc, aim for around -18dBfs. If your peaks are around -15dBfs, you’re doing fine. With something punchy with big volume spikes like drums, if your volume goes up to -10dBfs that’s cool - the body of the signal will be lower.

It’s just a way of making sure your signal isn’t hitting your converters too hard, that the plugins you use are seeing the signal level they expect, and the output from your converters to your speakers etc isn’t too loud when all the tracks are mixed together. It’s a ballpark, rule of thumb with some margin for error.

5 Likes

Thanks a lot for the explanation ! I understand it now :smiley:

One more thing though. How do you do this EXACTLY when using amp simulators. Atm I’m working with a line6 ux2 preamp (I know :flushed:) and I am only recording stuff for music creation. But this thing has no imput gain knob to change the incoming signal. Do I then use master volume of the ampsimulator to do what you explaind or ?

Greetings

Spot on. You can even do it the brainless fuckwit way (yes, this is the way I do it…) set your faders to unity and hit record. Use the clip that is recording in real time as a meter, adjust the gain so that the real time wave form is small, but not so small that you can’t see it. Works for me.

2 Likes

Thanks :slight_smile: All different views/approaches are welcome to me !

The major point he makes is to adjust the trim/gain.

On most DAWs this is PRE FADER meaning it lowers to output of the channel BEFORE you start adjusting levels for musical/mix purposes.

He’s suggesting setting the trim to a level where most of the channels are peaking at around -18db, only occasionally flicking above that.

I don’t know the hardware that well. I assume it’s got an input especially for guitar. In which case, what’ll be happening is that the guitar signal will be immediately converted to digital at whatever level line 6 have designed their software amp simulators to work at - so in that case, just use the amp sim software to control the levels on the amp for tone, and use the modelling software’s master volume to get the level coming out of the amp to a sensible level for mixing. Usually these models have a simulated amp “master volume” that affects the tone in the same way as a real amp would react, and another master volume that just transparently can be used to control the output volume with no effect on the tone.

It’s a common problem that software models, from guitar amps to drum packages to softsynths, have presets and defaults that output signals that are WAAAAY louder than they need to be, probably in a cynical attempt to impress hobbyists.

I’d argue that as long as you’re aware of your gain staging, this isn’t really worth doing. -18dBfs is just a reference level; chosen because the 18dB of headroom above that is then there to be used by transient peaks. If you have everything peaking at -18dB, your rms volumes, the bulk of your signal, will be way lower especially on drums. And if you use analogue modelled plugins, they expect signals that are around -18dBfs but with peaks that go over that - the way the analogue gear responds to transients that eat into the headroom is often part of its appeal, and a snare drum peaking at -18dB isn’t even going to be tickling, say, the modelled input stage of a compressor or tape simulator.

So yeah, I’d just say be aware of the volume you’re hitting while you record - don’t go too hot, don’t go too cold, peaks between -18 and -10dB are a good ballpark target depending on the nature of the signal. And while gain staging between plugins in your DAW, again, just be aware of the effect of the signal level on the plugins you’re using.

For example;

VOS plugins (annoyingly, in my opinion) are designed to operate around 0dBfs, with peaks above that! so if you record at a sensible level and use, say, VOS Tesla or Ferric or NastyDLA, if you want them to saturate as designed you need to boost the incoming signal up before the plug and bring it back down afterwards.

Waves etc are designed around the -18dBfs standard, but if you want to drive a plugin hard in the way you might drive a real piece of gear again you need to bring the volume up. Some plugs have clean input and output volumes so you can do all this in the plugin, others don’t so you need to consider afterwards how you want to control the signal flow through your chain.

Anyways… long post, TL;DR - be aware of gain staging and how it relates to your workflow + affects your plugs of choice.

1 Like

In Cubase (at least 8 and up) The signal flow is always to the “pre” section first, which is circled in the picture. From there the default configuration sends signal to inserts, then goes to channel strip, then to eq. However, the eq, strips and inserts can be put in any order. The last 2 insert points (7/8) are post fader.

1 Like

Do you mean the one I circled to the left ?

I don’t care if it where 50 pages :smiley: I realy appreciate you taking the time to explain these principles to me ! I’m kinda anal/autistic about knowing exactly what is meant, otherwise I can be to confused to be knowing what I’m doing. I can have a lot of “but if’s” realy fast when some one isn’t going into detail. So thanks :smiley: !

Yes

/6char

At first I thought so to. But then I lowerd it on an already recorded track, and it reduced the distortion on the guitar pretty signifficantly. Deuh ofcourse. But sitll, I guess it would mean that you need to crank up your amp a lot more to get the same effect if you work this way. Or not ?

Were there any plugins running behind the guitar in the chain? For example, if you have a compressor like a Waves LA-2A that reacts differently to the incoming signal based on how hard you’re driving the input (and see the overload button), then you would hear a significant difference in the tone and detail in the distortion.

Well, if what @Thunderhouse is saying is correct, then the left red circle is going into the plugin strip. the 8 slots you see on the far left in the picture. there would be my amp sim.

Yes that “pre” section is first, so lowering gain there would be like turning the volume down on your guitar before it gets to the amp. so that is exactly why you lose distortion. Same with the filters, it will alter then guitar tone. The only time I would use that gain is if the incoming signal is way too hot or way too low.

If you were going to look at the whole thing from an analog console point of view, think about the recorded signal as your mic/line and the “pre” section is acting like a microphone preamp with filters, then travel through the rest of the console channel.

I generally only use the filters on that section and very rarely use the gain trim unless I have received a ridiculously hot or low signal or trying to balance multiple tracks while keeping unity at faders.

1 Like

Yeah I fugured it would be something like that.

I’m doing it with the output volume of my ampsim now. Gotta turn it all the way down to get to around -18-15 db. Currious of how this is all gonna work when I start mixing this song :slight_smile:

Greets

Most plug-ins are configured to work around different operating levels, and most DAWs meter in dB Full Scale, which doesn’t consider headroom - it simply just chops audio past the 0dB point (in a none-too-pleasing way as well!).

Most DAWs (and their plug-ins) work in floating point—what he’s describing doesn’t happen in general. It did happen in Pro Tools TDM, in that although the mix buss had headroom, individual plugins output in 24-bit fixed-point, saturated (clipped) arithmetic; if one plugin clipped the signal, it would get passed on that way to the next, so you’d need to pay attention to clipping indicators per plugin.

But that’s not the way things work now—even Pro Tools has gone floating point. If a plugin chain is linear, it doesn’t matter if a plugin drives another, or a buss, with +24 dB, as long as you pull it back before sending to your converters and the analog world. Similarly, if your signal is too low, you don’t need to worry about noise with floating point, just add some gain and bring it back up.

Of course, for anything that’s non-linear, you probably need to feed it with a level that it expects. But this is not different than the analog realm. If a compressor is set for a certain threshold, you will not get the proper result by sending it a signal that remains below the threshold, or if you slam the threshold (assuming that’s not the sound you are going for).

And that bring up the issue of the amp simulator. Why no level indication to let you know how much signal to drive it with? Well, does your real guitar amp tell you how hard to drive it? :slight_smile:

2 Likes

Ok, now I’m a bit confused again :slight_smile:

Is it the case that if you actually mixed down to 32 bit floating point there would be no ISPs?